Automated webapp deployment - Git to Azure
GitOps
Have you heard of GitOps yet? I have come across this term on multiple Software Engineering Daily podcasts. And it is amazing how it fits into the idea of robust infrastructure and seamless deployment with infrastructure as code. One of the main essence of GitOps, as far as I understand and also what Atlassian has emphasized is that Git effectively can become one “source of truth”. Meaning for both code and infrastructure. I like this idea and point of this post is about reflecting Git changes on web deployments.
Deploying web app from GitHub to Azure
Pre-requisites
This post assumes that you have at least beginner level knowledge regarding Git, GitHub, Azure, Azure DevOps & Powershell.
Deploying GitHub source to web
The steps are nicely described in Microsoft documentation - Authorize Azure App Service. We need to prepare the repository with right files at the root for the Azure app service to perform the deployment.
This is what the following powershell script does using Azure PowerShell.
[CmdletBinding()]
Param(
    [Parameter()]
    [string]$resourceGroupName = "web-deployment-test-rg",
    [Parameter()]
    [string]$webappname = "webapp-github-deployment-" + $(Get-Random)
)

# Replace the following URL with a public GitHub repo URL
$gitrepo="https://github.com/realrubberduckdev/app-service-web-dotnet-get-started.git"
$location="UK South"

# Connect to Azure subscription
Connect-AzAccount

Get-AzResourceGroup -Name $resourceGroupName -ErrorVariable notPresent -ErrorAction SilentlyContinue
if ($notPresent)
{
    # Create a resource group.
    New-AzResourceGroup -Name $resourceGroupName -Location $location
}

# Create an App Service plan in Free tier.
New-AzAppServicePlan -Name $webappname -Location $location `
-ResourceGroupName $resourceGroupName -Tier Free

# Create a web app.
New-AzWebApp -Name $webappname -Location $location `
-AppServicePlan $webappname -ResourceGroupName $resourceGroupName

# Configure GitHub deployment to the staging slot from your GitHub repo and deploy once.
$PropertiesObject = @{
    repoUrl = "$gitrepo";
    branch = "master";
}
Set-AzResource -PropertyObject $PropertiesObject -ResourceGroupName $resourceGroupName `
-ResourceType Microsoft.Web/sites/SourceControls `
-ResourceName $webappname/web -ApiVersion 2019-08-01 -Force
Essentially the script does the following:
- Securely connect to Azure
- Create resource group if needed
- Create Azure app service
- Create Azure web app
- Set web app deployment to Github repo master branch
This is just one-time deployment as you may see the master branch is always synced with deployment. Any commits and changes to the web app will be deployed upon merge/push to master. Hence it is a continuous deployment model.
Blue/Green deployment from Github
This is the staging & product slots based deployment. The setup steps are described in Microsoft documentation. Although it is even easier to deploy using our powershell script below.
[CmdletBinding()]
Param(
    [Parameter()]
    [string]$resourceGroupName = "web-deployment-test-rg",
    [Parameter()]
    [string]$webappname = "webapp-github-deployment-with-slots-" + $(Get-Random)
)

# Replace the following URL with a public GitHub repo URL
$gitrepo="https://github.com/realrubberduckdev/app-service-web-dotnet-get-started.git"
$location="UK South"

# Connect to Azure subscription
Connect-AzAccount

Get-AzResourceGroup -Name $resourceGroupName -ErrorVariable notPresent -ErrorAction SilentlyContinue
if ($notPresent)
{
    # Create a resource group.
    New-AzResourceGroup -Name $resourceGroupName -Location $location
}

# Create an App Service plan in Free tier.
New-AzAppServicePlan -Name $webappname -Location $location `
-ResourceGroupName $resourceGroupName -Tier Free

# Create a web app.
New-AzWebApp -Name $webappname -Location $location `
-AppServicePlan $webappname -ResourceGroupName $resourceGroupName

# Upgrade App Service plan to Standard tier (minimum required by deployment slots)
Set-AzAppServicePlan -Name $webappname -ResourceGroupName $resourceGroupName `
-Tier Standard

#Create a deployment slot with the name "staging".
New-AzWebAppSlot -Name $webappname -ResourceGroupName $resourceGroupName `
-Slot staging

# Configure GitHub deployment to the staging slot from your GitHub repo and deploy once.
$PropertiesObject = @{
    repoUrl = "$gitrepo";
    branch = "master";
}
Set-AzResource -PropertyObject $PropertiesObject -ResourceGroupName $resourceGroupName `
-ResourceType Microsoft.Web/sites/slots/sourcecontrols `
-ResourceName $webappname/staging/web -ApiVersion 2019-08-01 -Force

# Swap the verified/warmed up staging slot into production.
Switch-AzWebAppSlot -Name $webappname -ResourceGroupName $resourceGroupName `
-SourceSlotName staging -DestinationSlotName production
Essentially the script does the following:
- Securely connect to Azure
- Create a resource group if needed
- Create Azure app service
- Create an Azure web app
- Create web deployment slots
- Set web app staging slot deployment to Github repo master branch
- Finally switch the slots so the current state of master becomes available in the production slot
So now that deployment is done, you can go ahead make a change in master. Did you notice that your change is not reflected in the web pages? Let me explain why. The script configures the staging slot to be synced with master and not the production. That is why the script swaps slots at the end. Meaning we need to do the same when master gets new changes and this is where we can do magic using Azure DevOps.
Azure Pipelines CI-CD
Azure pipelines YAML based pipeline with multiple stages is what we need. The yaml below
- triggers on a change to master
- does a ‘dummy build & test’ as an example, you should do your proper build, followed by another unit testing phase
- because staging slot is already synced with the master branch, we do not need a specific stage for that
- the final deploy to production is a gated stage and needs approval.
trigger:
- master

pool:
  vmImage: 'windows-latest'

variables:
  solution: '**/*.sln'
  buildPlatform: 'Any CPU'
  buildConfiguration: 'Release'

stages:
- stage: Build
  jobs:
  - job: Build
    pool:
      vmImage: 'windows-latest'
    steps:
    - script: echo "All build and test pass."
- stage: deploy_to_production
  dependsOn: Build
  jobs:
  - deployment: deploy_to_production
    pool:
      vmImage: 'windows-latest'
    environment: 'deploy_to_production'
    strategy:
      runOnce:
        deploy:
          steps:
            - task: AzureAppServiceManage@0
              displayName: AzureAppServiceManage - Swap slots
              inputs:
                azureSubscription: 'Visual Studio Enterprise (77be59ef-9321-4911-8e68-dde3b63a9e67)'
                Action: 'Swap Slots'
                WebAppName: 'webapp-github-deployment-with-slots-1439770693'
                ResourceGroupName: 'web-deployment-test-rg'
                SourceSlot: 'staging'
This YAML file stays in the git repo and triggers Azure pipelines upon change to master. Team members can test the changes on the staging URL before approving, thereby swapping the slots and deploying changes to production.
Deployment using docker
Another method of automated deployment is using docker settings on Azure app service. For this, we will need a docker image, as shown below. This is the docker file used to deploy this blogging website.
FROM node:12.11.1 AS builder
WORKDIR /dpblog
RUN npm i -g gatsby-cli
COPY package*.json ./
RUN npm install
COPY . .
RUN gatsby build

FROM gatsbyjs/gatsby:latest
COPY --from=builder /dpblog/public/ /pub
This is a multi-stage docker file and the first builder stage is used to build the static gatsby website. Followed by the second stage, where it gets the latest gatsby docker image, which essentially has nginx and hosts the static website by copying it across from the builder.
This will need Azure pipelines again to do the build and deployment.
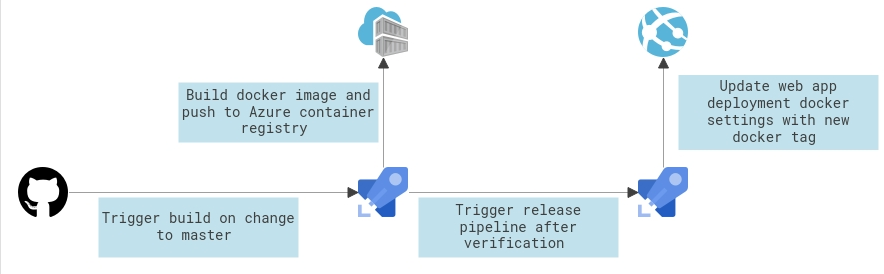
As the architecture diagram shows, we will need to build a new image with the new static contents. Azure pipelines can build this and push to azure container registry. Then either after validation or approval gates or automated deployment, Azure pipelines can then update the Azure app service docker settings to pick up the new docker image.
Conclusion
Azure, Azure pipelines, Github work seamlessly in these scenarios of web deployment. We can keep all relevant info from code, infrastructure creation to pipeline and more on Git. Making it one “source of truth”.
Github
For full code visit realrubberduckdev/app-service-web-dotnet-get-started.